Tutorial – Game Structure – Basic
May 30, 2010 4 Comments
Well I am very grateful for all of the comments being left on my blog and one of the frequent requests has been for game structure. I will make my disclaimer once again, I am in no way an expert at programming for the Iphone (or anything for that matter), BUT I will try to explain how I managed to do it in my Game “Planet One”.
This tutorial is going to be fairly vague as each games runs a little different and I want to give just some basic information so you can adapt the CONCEPT for the code your are writing.
I will start off by explaining how my game is structured then go into how I accomplished it.
Lets start with some assumtions for THIS TUTORIAL.
- We will assume we are using TiledMaps to control our levels. (PlanetOne uses TiledMaps as well as SVG files for Box2D objects)
- We will assume we have to complete a level which will give access to the next level, BUT that a player can re-play any level they have beaten.
So, in my case, I start off with a menu which allows them to select play.
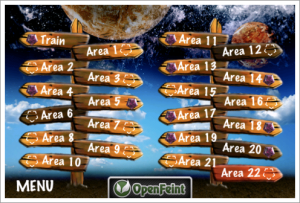
Then they get to choose a level. Only the levels they can choose are visible or enabled.
Once they choose a level then they can select if they want to play on easy or hard.
And this is the path taken to getting into a Level or area on the game.
Now how is the game structured to accommodate this path of level selection.
W can treat the Boiler plate code for the HelloWorld application, and think of this as our GameLogicClass. This class will hold all of the information for graphics, inserting our player, inserting our baddies, music, collision reactions, and of course our tick or updating (gameloop).
Now lets not think that all of our code is placed in this class but this class acts as a parent to most of these things, or calls upon other classes such as a player class or a baddie class. But it is a hub for everything important in our game.
From there what I did was create a subclass of GameNode class, which was a ‘Level’ class. In the level class I have a “initGraphics” for the graphics of my level, which in he case of the tutorial is our tiledmap.
Lets Look at how this relates to the above menu example.
So the user will select play, then a level. Lets say Level 1.
The menu item for level 1 will call a method for Level 1. that method will specify the class for our levels (Level Class) and it will also set our current level to Level 1.
I use a variable to remember what Level the player has selected and are playing. This “currentLevel” variable will be assigned a “1” since the user selected to play Level 1.
Lets look at some code for this.
CCMenuItemLabel * _level1 = [CCMenuItemLabel itemWithLabel:m1label target:self selector:@selector(level1:)];
-(void) level1:(id)sender

{

[[GameConfiguration sharedConfiguration] setTimeEasy:150];

[[GameConfiguration sharedConfiguration] setTimeHard:26];

[[GameConfiguration sharedConfiguration] setCurrentLevel:1];

[self setLevelScene:[LevelIntro class]];

}
-(void) setLevelScene:(Class)klass

{

[[SimpleAudioEngine sharedEngine] playEffect:@"menuSelect.wav"];

[[CCDirector sharedDirector] replaceScene: [CCFadeTransition transitionWithDuration:0.5f scene:[klass scene]]];

}
So this bit of code will set up some of the characteristics for Level1, such as “currentLevel”, “easy and hard times”. Then it will send us over to the Level intro scene which is where the user selects is they want to play on easy or hard.
The LevelIntro Class is a very simple menu which simply sets up the selected “easy or hard” into a variable so we know what they have chosen, then it send us over to the Levels Class. Remember this was the subclass for our GameNode.
Now lets look at our Levels Class (just a snippet of code not the entire class):
@implementation Levels
-(void) initGraphics

{

currentLevel_ = [[GameConfiguration sharedConfiguration] currentLevel];
// Scrolling Background for Clouds
clouds1 = [CCSprite spriteWithFile:@"clouds.png"];

clouds1.anchorPoint = ccp(0,0);
 //

// Parallax Layers

//

CCParallaxNode *parallax = [CCParallaxNode node];
// A switch to set the background image and TMXTiledMap
switch ( currentLevel_) {
case 0:
// Level 0 - Training Level Code
break;
case 1:

// Background

bg1b = [CCSprite spriteWithFile:@"LightSky.png"];

bg1b.anchorPoint = ccp(0,0);

[parallax addChild:bg1b z:-15 parallaxRatio:ccp(0,0.4f) positionOffset:ccp(0,50)];

[parallax addChild:clouds1 z:-11 parallaxRatio:ccp(0, 1) positionOffset:ccp(0,0)];
// tiled
tiled = [CCTMXTiledMap tiledMapWithTMXFile:@"Level1.tmx"];
tiled.anchorPoint = ccp(0,0);
[parallax addChild:tiled z:9 parallaxRatio:ccp(1,1) positionOffset:ccp(0,0)];
break;
//.......Then the other cases for our other levels.
} // End of Switch
// PlanetOne spriteSheet

spriteSheet_ = [CCSpriteSheet spriteSheetWithFile:@"spriteSheet.png" capacity:1];

[parallax addChild:spriteSheet_ z:10 parallaxRatio:ccp(1,1) positionOffset:ccp(0,0)];
// weak ref

playerSheet_ = [CCSpriteSheet spriteSheetWithFile:@"playerSprites.png" capacity:1];

[parallax addChild:playerSheet_ z:10 parallaxRatio:ccp(1,1) positionOffset:ccp(0,0)];
[self addChild:parallax];
This class sets up the “initGraphics” for a method in our GameNode Class.
If you have built your gameNode properly, you can then use the TMX tiledmap selected here to setup all of your collision objects and collectables and baddies positions.
So like I said at the beginning…this is fairly vague but gives you a good idea of what I did to use as little code as possible to generate ANY NUMBER of levels that you want.
Inside your GameNode class you can have a method which looks through your tiledmap’s layers for gid’s which you can use for inserting baddies, setting up boundaries or obstacles, and placing your player to start.
Once you have everthing setup for your fist level and you like how everthing is behaving. All you need to do is create a TMX tiledmap for all of your levels and place them in your resources.
To Sum it all up:
Once a player selects that level from the menu, it will set the currentLevel var to be perhaps “5”…..then they are sent to LevelIntro class where they select easy….this sets the “easy variable” to “true” (which sets a label in the HUD to that easy timer amount)…..then the Director is transitioned to the Level Class where a “Switch” is used to setup the graphics for that level (backgrounds and TMX tiledmap). This “initGraphics” is used in the parent class “GameNode Class” for an initGraphics method. You now move through the TMX tiledmap looking for Gid’s to setup all of your game objects.
Each time a player selects a new Level menu item (which will set a “currentLevel” var to that level integer. Then “Levels Class” sets the TMX tiledmap via the “currentLevel” variable. and this is what our GameNode uses to setup the game.
Well I hope this made things a little more clear for the absolute beginner out there, but as I said I am no expert and I am sure there are many ways to structure a game. Also it completely depends on what your game is and how you play it. BUT saying all of that I do hope this blog entry helps out.


Jason, do you have a code snippet that shows how you track baddies and their bodies using box2D as I have found it very difficullt to get bodies to follow baddies (for collision deection) which being are moved with actions.
FYI: My actor moves and the camera is used to scroll the background.
Dude, you have been asking the same thing since March! Why don’t you read the code and learn something for yourself, what you want, him to write your damn game? Sheesh some people are nutjobs
I’ve been going through a lot of your videos and tutorials. I am just starting out and was able to get a tiled background to draw into the background and then was able to draw an animated sprite on top of it from following your and others’ tutorials.
All the tutorials I’ve found have been doing all the code in the HelloWorld.m’s init method, I wanted to move what I had working into separate classes. I created a sprite.h and sprite.m file and basically put what I had already working into sprite.m in a method I created -(void) spawnSprite. Then within the HelloWorld.m file, which I renamed to main.m (and main.h), I put [sprite spawnSprite]; into the init. Everything compiles with no errors, but the program just crashes immediately and I get a warning the “sprite” may not respond to “+spawnSprite” . I haven’t been able to find any Cocos2d tutorials that explain how the init method in helloWorld.m works.
When you started breaking up your code into multiple classes and files, did you figure it out on your own or were you able to find some good examples that you followed? If you found some good tutorials or open source examples, please let me know.
Thanks a lot for the blog and tutorials, I really enjoy them.
has this blog died? whens this new app coming out then paulson? 😛